
Chocolate Crispy Caramel Cups (Vegan No-Bake)
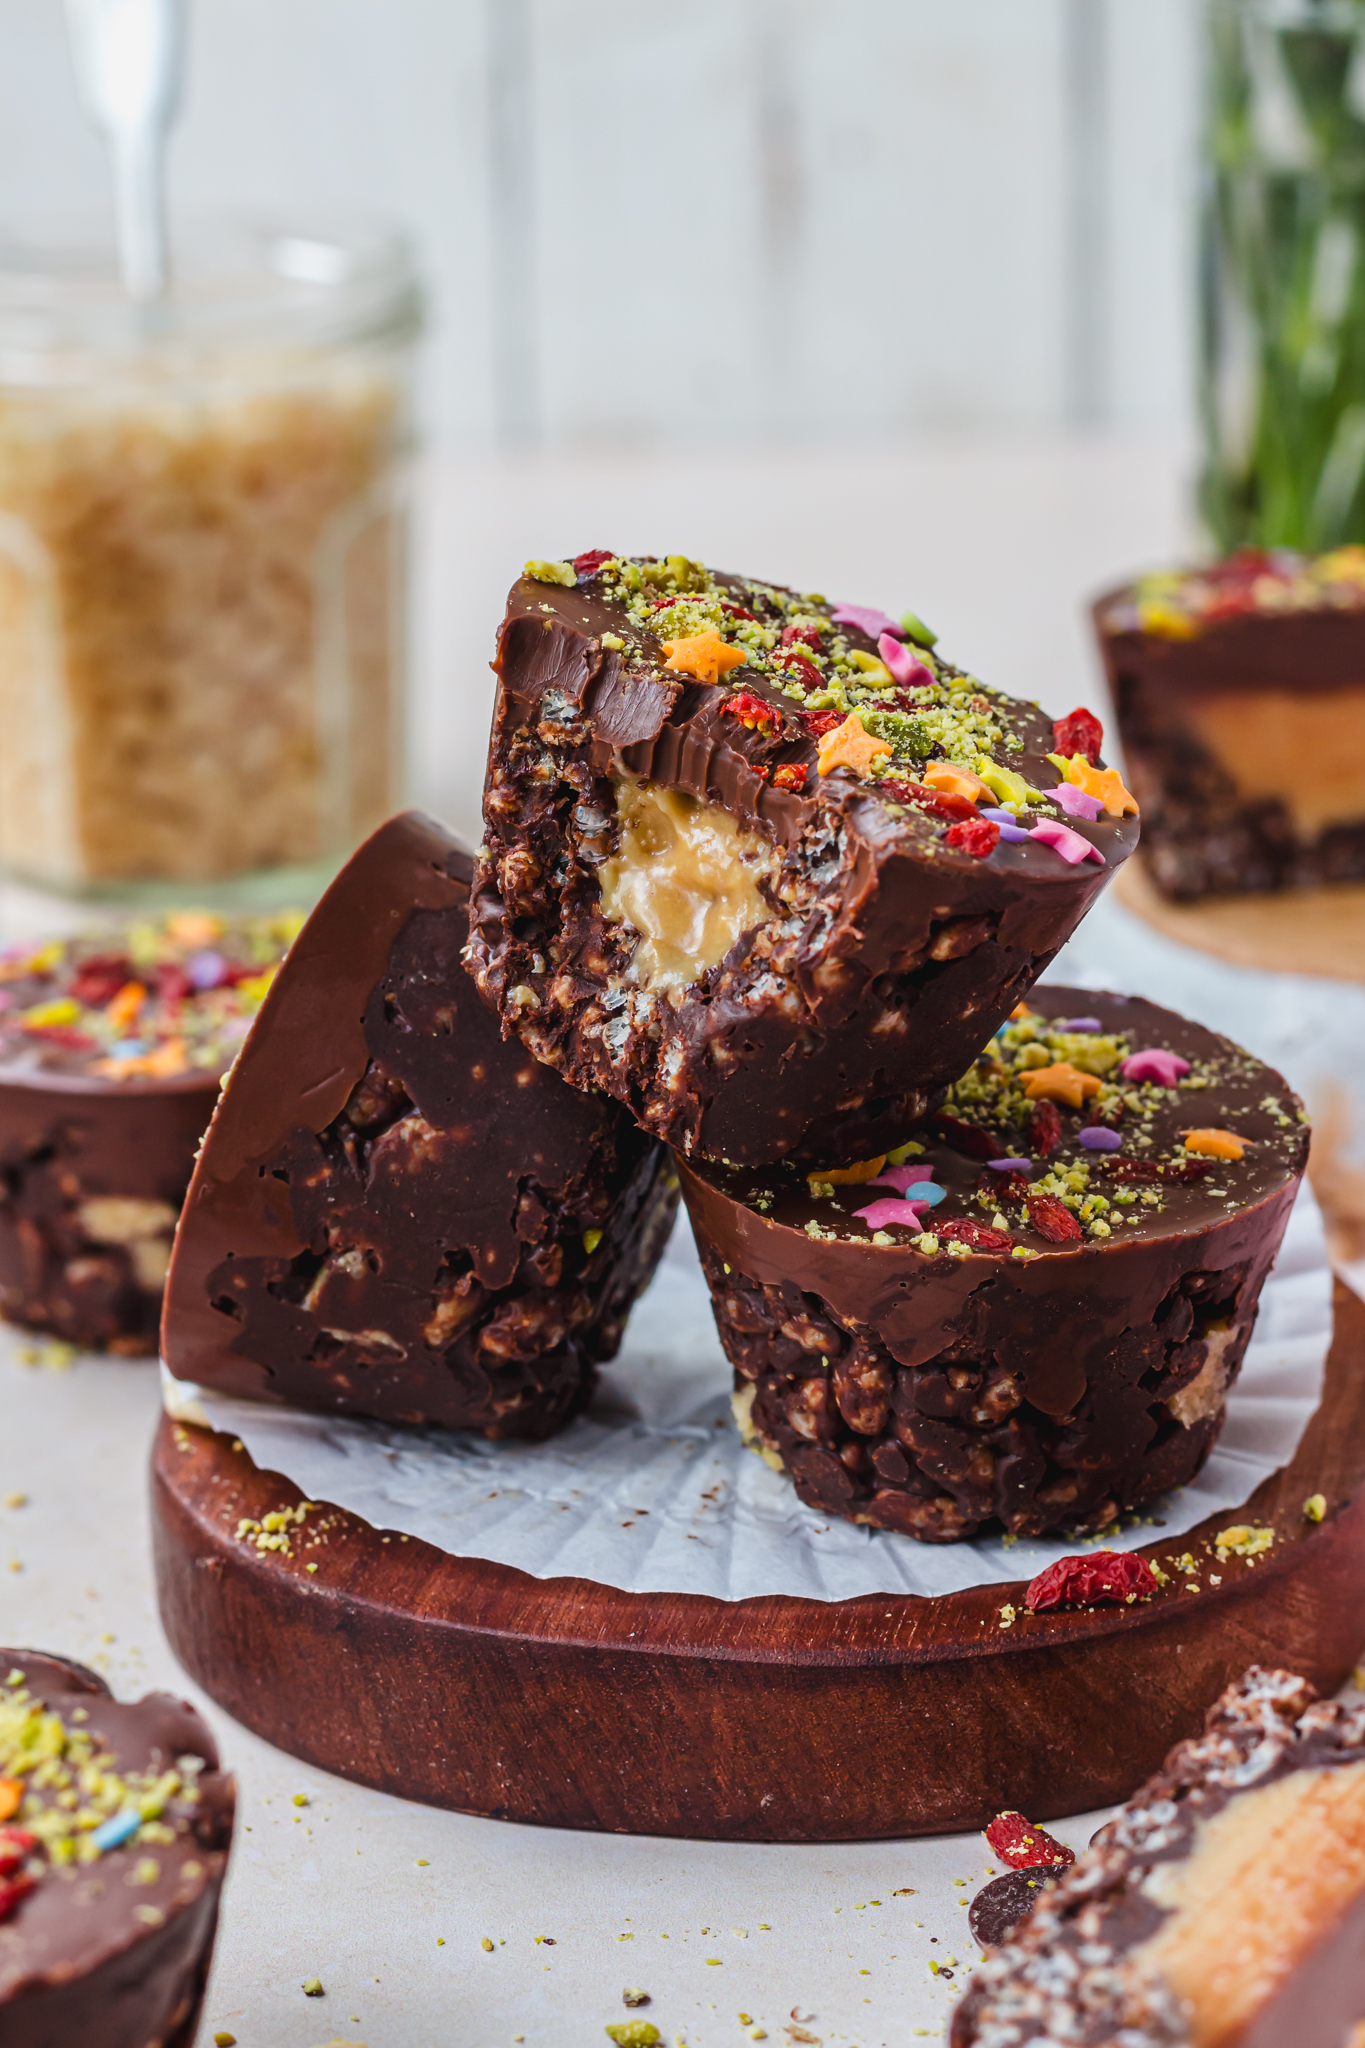

Thick delicious and indulgent Easter Chocolate Crispy Caramel Cups with a homemade healthier caramel middle and a creamy chocolate top. Add on sprinkles and dried fruits for a fun, no-bake, vegan and gluten-free treat.
I love making chocolate Easter nests or crispy cakes and wanted to make them a little differently this year. So, instead of the usual nest with a few (vegan) mini eggs on top, I made the base into a cup, filled them with a simple, healthier caramel and topped them off with more chocolate. The result is delicious, super chocolatey, indulgent and rich and slightly gooey in the middle. Plus they are perfect for making with little ones as they are no-bake, and fun.

Why will I love these cups?
These cups are so amazing:
- Rich, chocolatey, indulgent and salty sweet
- Crunchy, crispy, smooth and creamy
- No-bake
- Naturally vegan, egg-free and dairy-free
- Easily gluten-free and nut-free
- Made with more wholesome ingredients
- Upgrades the classic crispy cake
- Ideal for Easter no-baking
- Delicious all year round
- Can de decorated with whatever you like
- Filled with gooey no-bubble and wholesome caramel
- Topped with thick creamy chocolate
- Easy and quick to make
- Fun to make with little ones
- Ideal to prepare ahead of time
If you already love the sound of these cups then skip ahead to the recipe card below. Or, first let’s discuss the recipe in more detail.


What ingredients do I need?
The ingredients are listed with weights in the recipe card and you can see my favourites in the “shop the recipe” section.
For the cups:
- Oat Mylk Chocolate Chips: I use the Food Thoughts Oat Mylk Chocolate Chips which are so delicious and creamy, they’re not too sweet but also not too dark, so they are perfect for this recipe. You can use other chocolate and if using a bar, chop it up small to melt down.
- Smooth peanut butter: the smoother the better for this recipe, and you can use other nut butter like almond or cashew or try sunflower seed butter or tahini to make these nut-free.
- Coconut oil: to help the bases set.
- Cocoa powder: to make these really chocolatey. You can also use cacao powder.
- Coconut cream: this adds creaminess to the base, so they are softer to sink your teeth into. This is the solid part of a tin of full-fat coconut milk or use thick coconut yoghurt like Cocos Organic, where the ingredients are natural and a very high percentage is coconut cream.
- Maple syrup: for sweetens and stickiness. You can also use agave syrup.
- Rice crispy cereal: for the crispy crunch. Use your favourite puffed or crispy cereal, here.


And for the caramel middle:
- Smooth peanut butter: as above.
- Coconut oil: to help the caramel set soft enough to bite but solid enough to hold shape.
- Maple syrup: as above.
- Salt: to make the caramel slightly salted and delicious.
Finally for the chocolate top:
- Oat Mylk Chocolate: or use other chocolate to melt down.
- Mixed dried fruits/nuts/seeds/sprinkles: use whatever you have ton hand, and the more colourful the better. I used crushed pistachios, goji berries and sprinkles.
Are these gluten-free and nut-free?
These are naturally gluten-free, as long as your cereal is gluten-free. To make these nut-free, swap the peanut butter throughout the recipe with sunflower seed butter or tahini and check your chocolate for nuts.

How do I make them?
These are simple to make in a few steps:
- Melt together the chocolate, peanut butter and coconut oil: until glossy.
- Stir in the other crispy base ingredients: and combine well.
- Shape into cups: pressing down to make sides and a base. Chill in the fridge.
- Whisk together all of the caramel ingredients: until smooth.
- Pour the caramel into the cups: filling to the top and chill in the fridge.
- Melt the chocolate and coconut oil for the top: and pour over the caramel.
- Decorate as you please: and chill again in the fridge.
How long will they last?
These cups will keep for up to 1 week in the fridge in a sealed container, and best eaten straight from the fridge for the crispiest cup, or at room temperature for a gooier caramel. You can freeze the cups, wrapped well, for 1 week and allow to defrost before eating.

What other recipes can I try?
For more Easter ideas, how about:
- Cookie Dough Chocolate Crispy Slices
- Mini Egg Chocolate Marble Protein Bars
- Chocolate Caramel Mini Egg Slices
- Giant Chocolate Crispy Cake
- Chocolate Banana Easter Speckle Cake

Chocolate Crispy Caramel Cups (Vegan No-Bake)
Thick delicious and indulgent Easter Chocolate Crispy Caramel Cups with a homemade healthier caramel middle and a creamy chocolate top. Add on sprinkles and dried fruits for a fun, no-bake, vegan and gluten-free treat.
Ingredients
For the Crispy Cups:
- 60g oat mylk or dairy-free chocolate chips
- 30g smooth peanut butter
- 1 tbsp coconut oil
- 2 tbsp cocoa powder
- 25g coconut cream
- 1 tbsp maple syrup
- 30-40g rice crispy cereal
For the Caramel:
- 60g smooth peanut butter
- 2 tbsp melted coconut oil
- 2 tbsp maple syrup
- Pinch of salt
For the Chocolate Tops:
- 160g oat mylk or dairy-free chocolate chips
- 2 tsp coconut oil
- 3 tbsp mixed nuts/dried fruits/sprinkles
Instructions
- Have a silicone cupcake tray to hand, or line a metal tray with 6 cases.
- For the bases: in a bowl, melt together the chocolate chips, peanut butter and coconut oil until glossy (in the microwave or over a pan of simmering water). Now sift in the cocoa powder and add the coconut cream and maple syrup and whisk until smooth. Add in the crispy cereal and salt and stir until the mix is combined.
- Divide the crispy mixture between the holes or cases and press into cup shapes.
- Place in the fridge for 30 minutes, to set.
- For the caramel: whisk together the ingredients with a pinch of salt until smooth.
Remove the cups from the fridge and divide the caramel between the cups and return them to the fridge for 30 minutes. - For the chocolate tops: melt together the chocolate chips and coconut oil. Remove the cups from the fridge and pour over the chocolate. Sprinkle over your desired nuts or dried fruits or sprinkles.
- Chill the cups in the fridge for 30-60 minutes, until the chocolate has set. Remove the cups from their cases and enjoy straight away.
- Keep leftover crispy cups in the fridge for 1 week or in the freezer for 1 month. Allow to defrost before eating.
Shop the recipe

Stay in touch
I look forward to hearing what you think of these Chocolate Crispy Caramel Cups so please let me know in the comments below and leave a star review above. If you do make these, I’d love to see so please tag me, I’m @nourishing.amy on Instagram and use the hashtag #nourishingamy. I’m also on Twitter, Facebook and Pinterest – please say hello!
p.s. this recipe was first made with Food Thoughts althea this blog post is not sponsored and all opinions are my own.
 Skip to Recipe