
Red Velvet Cheesecake Brownies (Vegan Gluten-Free)
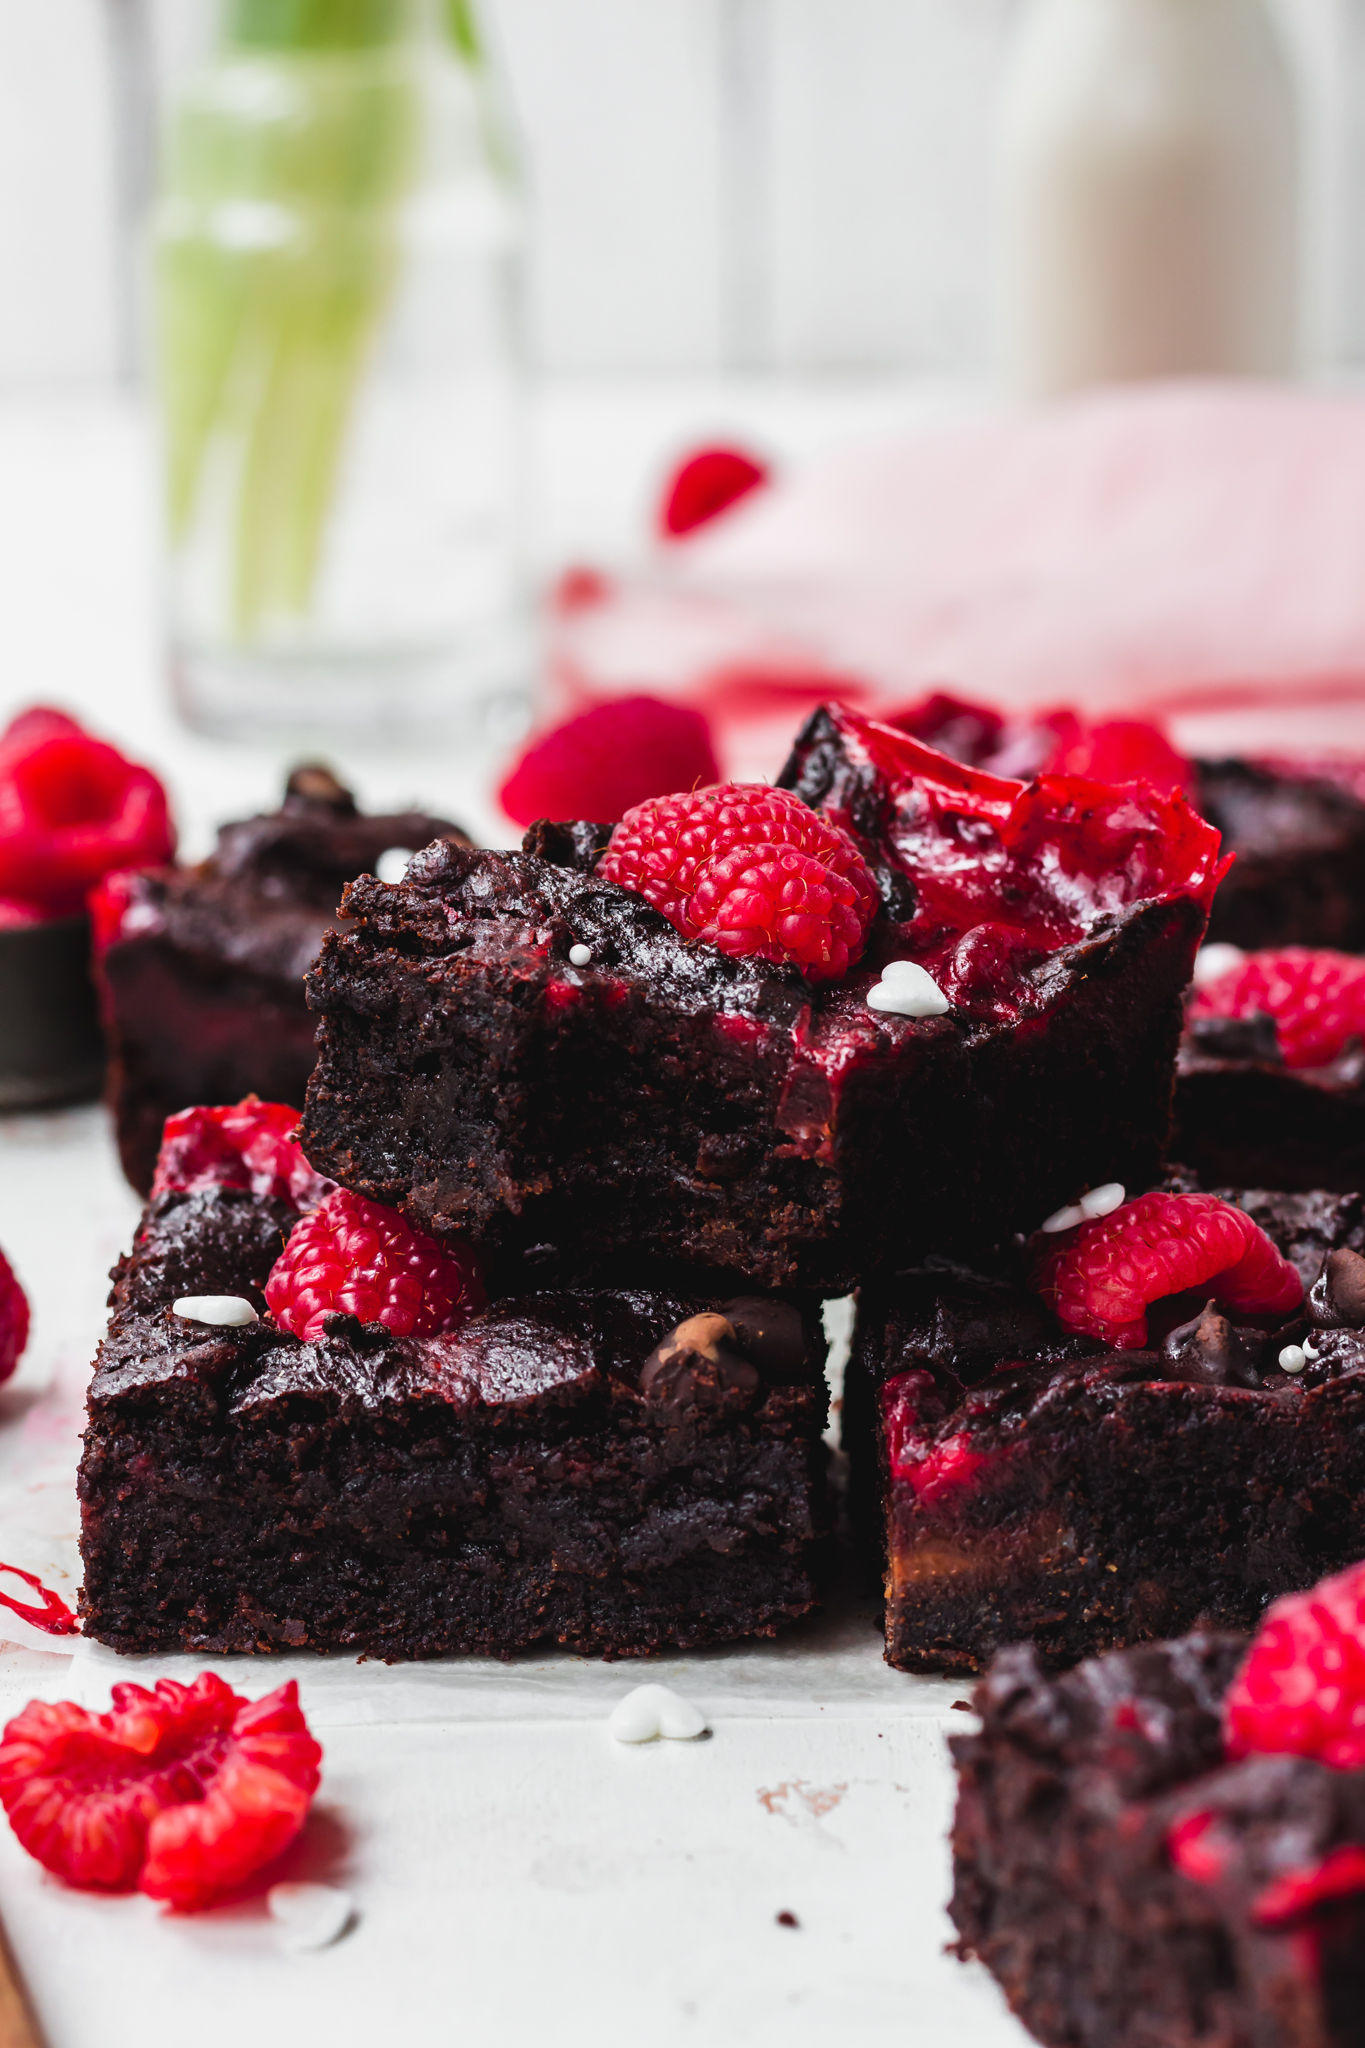

The ultimate vegan Red Velvet Cheesecake Brownies with a rich chocolate fudge brownie base topped with delicious red velvet cheesecake finished with raspberries and chocolate chips. These are wholesome, easy to make and easily gluten-free and nut-free.
If you just love brownies and want to make them a bit more special this time of year (it’s just been Valentine’s Day for those celebrating) then these raspberry chocolate fudge cheesecake brownies are the way to go. They taste like red velvet cheesecake, chocolate brownie and raspberries in every bite and are made from wholesome ingredients, too.

Why will I love these brownies?
These brownies are amazing, they are:
- Rich, chocolatey and super fudgy
- Taste like red velvet cake and cheesecake in every bite
- Made with a simple one-bowl brownie batter and a one-bowl cheesecake mix
- Require no fancy ingredients or equipment
- Naturally vegan, dairy-free and egg-free
- Easily gluten-free and nut-free
- Made from wholesome ingredients
- Lighter, lower sugar and more fibre-packed than traditional brownies
- Delicious for dessert or afternoon snacking
If you already love the sound of these brownies then skip ahead to the recipe card below. Or, first let’s discuss the recipe in more detail.


What ingredients do I need?
The brownie recipe is based on my Gingerbread Fudge Brownie as I love it so much.
Here’s the ingredients for the brownie:
- Thick coconut yoghurt: for moisture, richness and fat, the coconut yoghurt makes these brownies really fudgy. Make sure it’s a thick Greek-style yoghurt like Cocos Organic natural or vanilla yoghurt. Runny yoghurt will not produce the same overall texture.
- Runny smooth tahini: I love using tahini in brownies as it’s rich, smooth and slightly “nutty” while being nut-free. you can use any other nut or seed butter (like peanut or cashew butter) as long as it’s smooth and runny. If needed, warm up the nut/seed butter in the microwave to make it runnier.
- Applesauce: this is for moisture, sweetness and for its natural binding abilities. Make sure it’s 100% apples and you can swap this for mashed banana, if you prefer.
- Coconut sugar: for sweetness and overall flavour I choose coconut sugar but white or golden caster sugar will also work.
- Maple syrup: for sticky sweetness I love using maple syrup but agave or vegan honey will also work.
- Coconut oil: melt the coconut oil to add some richness and melt-in-your-mouth texture to these brownies.
- Chia or flaxseeds: without eggs, the chia or flaxseed help to bind the batter. To grind your own chia seeds, add them to a blender and process into a fine flour. You can make up a big batch and store in an airtight container for 2-3 months.
- Plain or GF plain flour: to keep the brownies light and fudgy, I use plain flour and if needing to make them gluten-free, use your preferred gluten-free flour blend.
- Vegan chocolate protein powder: I love the deluxe chocolate or chocolate hazelnut proteins from Macromike for these brownies. Or use any other chocolate protein and my code AMB-AMY saves you 10%.
- Cocoa powder: this is better for brownies over cacao powder as cocoa is more acidic and reacts better with the bicarbonate of soda so creates a better structure.
- Bicarbonate of soda and salt: for rise and flavour.
- Dark chocolate: chop up your favourite dairy-free dark chocolate bar or use chips or buttons.
- Raspberries: for pressing into the top. You could also use fresh strawberries, blueberries or blackberries.


And for the cheesecake mix:
- Vegan cream cheese: I love to use NUSH or Violife as they are creamy and smooth.
- Caster sugar: for sweetness. I use caster sugar here so as not to affect the overall colour as coconut sugar is much darker, but use your preferred sugar.
- Cornstarch: this helps thicken the mix as there is no egg in here.
- Vanilla: for flavour.
- Lemon juice: for tang like a classic cheesecake.
- Red food gel: this is purely for the colour and make sure it’s vegan. You can find a great range of vegan colours and sprinkles on The Baking Time Club and my code AMY20 saves you 20%.
How do I make them?
These are easy to make in a few steps:
- Whisk together the cheesecake ingredients: till smooth.
- For the brownies, start with all the wet ingredients: and whisk till smooth.
- Sift in the dry ingredients: and whisk or stir to a thick, smooth batter.
- Fold in the chopped chocolate: and separate into two.
- Spread ¾ of the mix into a lined square tin: and smooth over the top.
- Spoon over the cheesecake mix: and swirl over the top.
- Spoon over the remaining brownie natter: and swirl again.
- Add on the raspberries and extra chocolate: and bake for 40 minutes.
- Do not be tempted to overbake as they will firm up as they cool: the cheesecake mix is very wet but will firm up thanks to the cornstarch.
- Allow to cool fully, ideally overnight: the tops will soften and become really fudgy.
- Slice into 12 brownies: and add on extra raspberries and sprinkles, if you like.


Are they gluten-free and nut-free?
These are naturally nut-free, just check that your yoghurt, protein, cream cheese and chocolate do not contain nuts. To make these brownies gluten-free, use your preferred 1:1 baking flour lend that contains xanthan gum.
How long will they last?
These will keep for 2-3 days in the fridge in a sealed container or in the freeze for up to 1 month. Allow to defrost before eating.

What other brownies and Valentines Day recipes can I make?
For more delicious desserts and snacks, how about my:
- Vegan Biscoff Caramel Brownies
- Vegan Banoffee Pie
- Valentines Day Banana Bread
- Chocolate Raspberry Ganache Tart
- Vegan Black Forest Tiramisu

Red Velvet Cheesecake Brownies
The ultimate vegan Red Velvet Cheesecake Brownies with a rich chocolate fudge brownie base topped with delicious red velvet cheesecake finished with raspberries and chocolate chips. These are wholesome, easy to make and easily gluten-free and nut-free.
Ingredients
For the Cheesecake Mix:
- 100g vegan cream cheese
- 3 tbsp caster sugar
- ½ tsp cornstarch
- 1 tsp vanilla essence
- 1 tsp lemon juice
- A few drops of vegan red food gel
For the Brownies:
- 120g thick coconut yoghurt
- 120g runny smooth tahini (or nut butter)
- 100g applesauce
- 75g coconut sugar
- 3 tbsp (45ml) maple syrup
- 2 tbsp melted coconut oil
- 1 tbsp ground chia seeds
- 60g plain or GF plain flour
- 40g vegan chocolate protein powder
- 40g cocoa powder
- ½ tsp bicarbonate of soda
- A pinch of salt
To Add On:
- 50g dark chocolate (truffles, chips or a chopped up bar), plus extra
- 12 raspberries, plus extra to serve
- Sprinkles, to serve
Instructions
- Preheat the oven to 160Fan/180ºC and line an 8-inch square tin (ideally loose-bottomed) with parchment paper.
- Make the cheesecake mix: whisk together the ingredients till really smooth, then add the food gel to your desired colour.
- Make the brownies: whisk together the yoghurt, tahini, applesauce, sugar, syrup, coconut oil and chai seeds till smooth. Sift in the flour, protein powder, cocoa powder and bicarbonate of soda and add the salt. Whisk and then stir to a thick, smooth batter. Fold in the chopped chocolate.
- Into the tin: spoon ¾ of the brownie mix and make an even layer. Spoon over the cheesecake mixture and swirl it roughly on top. Now spoon over the remaining brownie batter and swirl it all together. Sprinkle with extra chocolate chips, if desired and press in the raspberries.
- Bake the brownies: in the middle of the oven for 40 minutes, till the edges are cooked through but the middle will feel very jiggly (this is because of the cheesecake filling).
- Allow the brownies to cool fully: after 30 minutes, if using a loose-bottomed tin, carefully remove the brownies on the tin or otherwise, leave in the tin to cool fully. The cheesecake layer will set as it cools and the tops of the brownies will soften.
- To serve: use a warmed, sharp knife to slice the brownies into 12 (around the raspberries) and serve with extra raspberries and sprinkles, if you like. Enjoy straight away.
- To store: keep the brownies in a sealed container in the fridge for 2-3 days or in the freeze for 1 month and allow to defrost before eating.
Recommended Products
As a brand ambassador and affiliate, I may earn commission from links.


Shop the recipe

I look forward to hearing what you think of these Red Velvet Cheesecake Brownies so please let me know in the comments below and leave a star review above. If you do make these, I’d love to see so please tag me in your brownies, I’m @nourishing.amy on Instagram and use the hashtag #nourishingamy. I’m also on Twitter, Facebook and Pinterest – please say hello!
With cheesecake brownie love x
 Skip to Recipe