
Chickpea Tuna Sushi Rolls (Vegan)
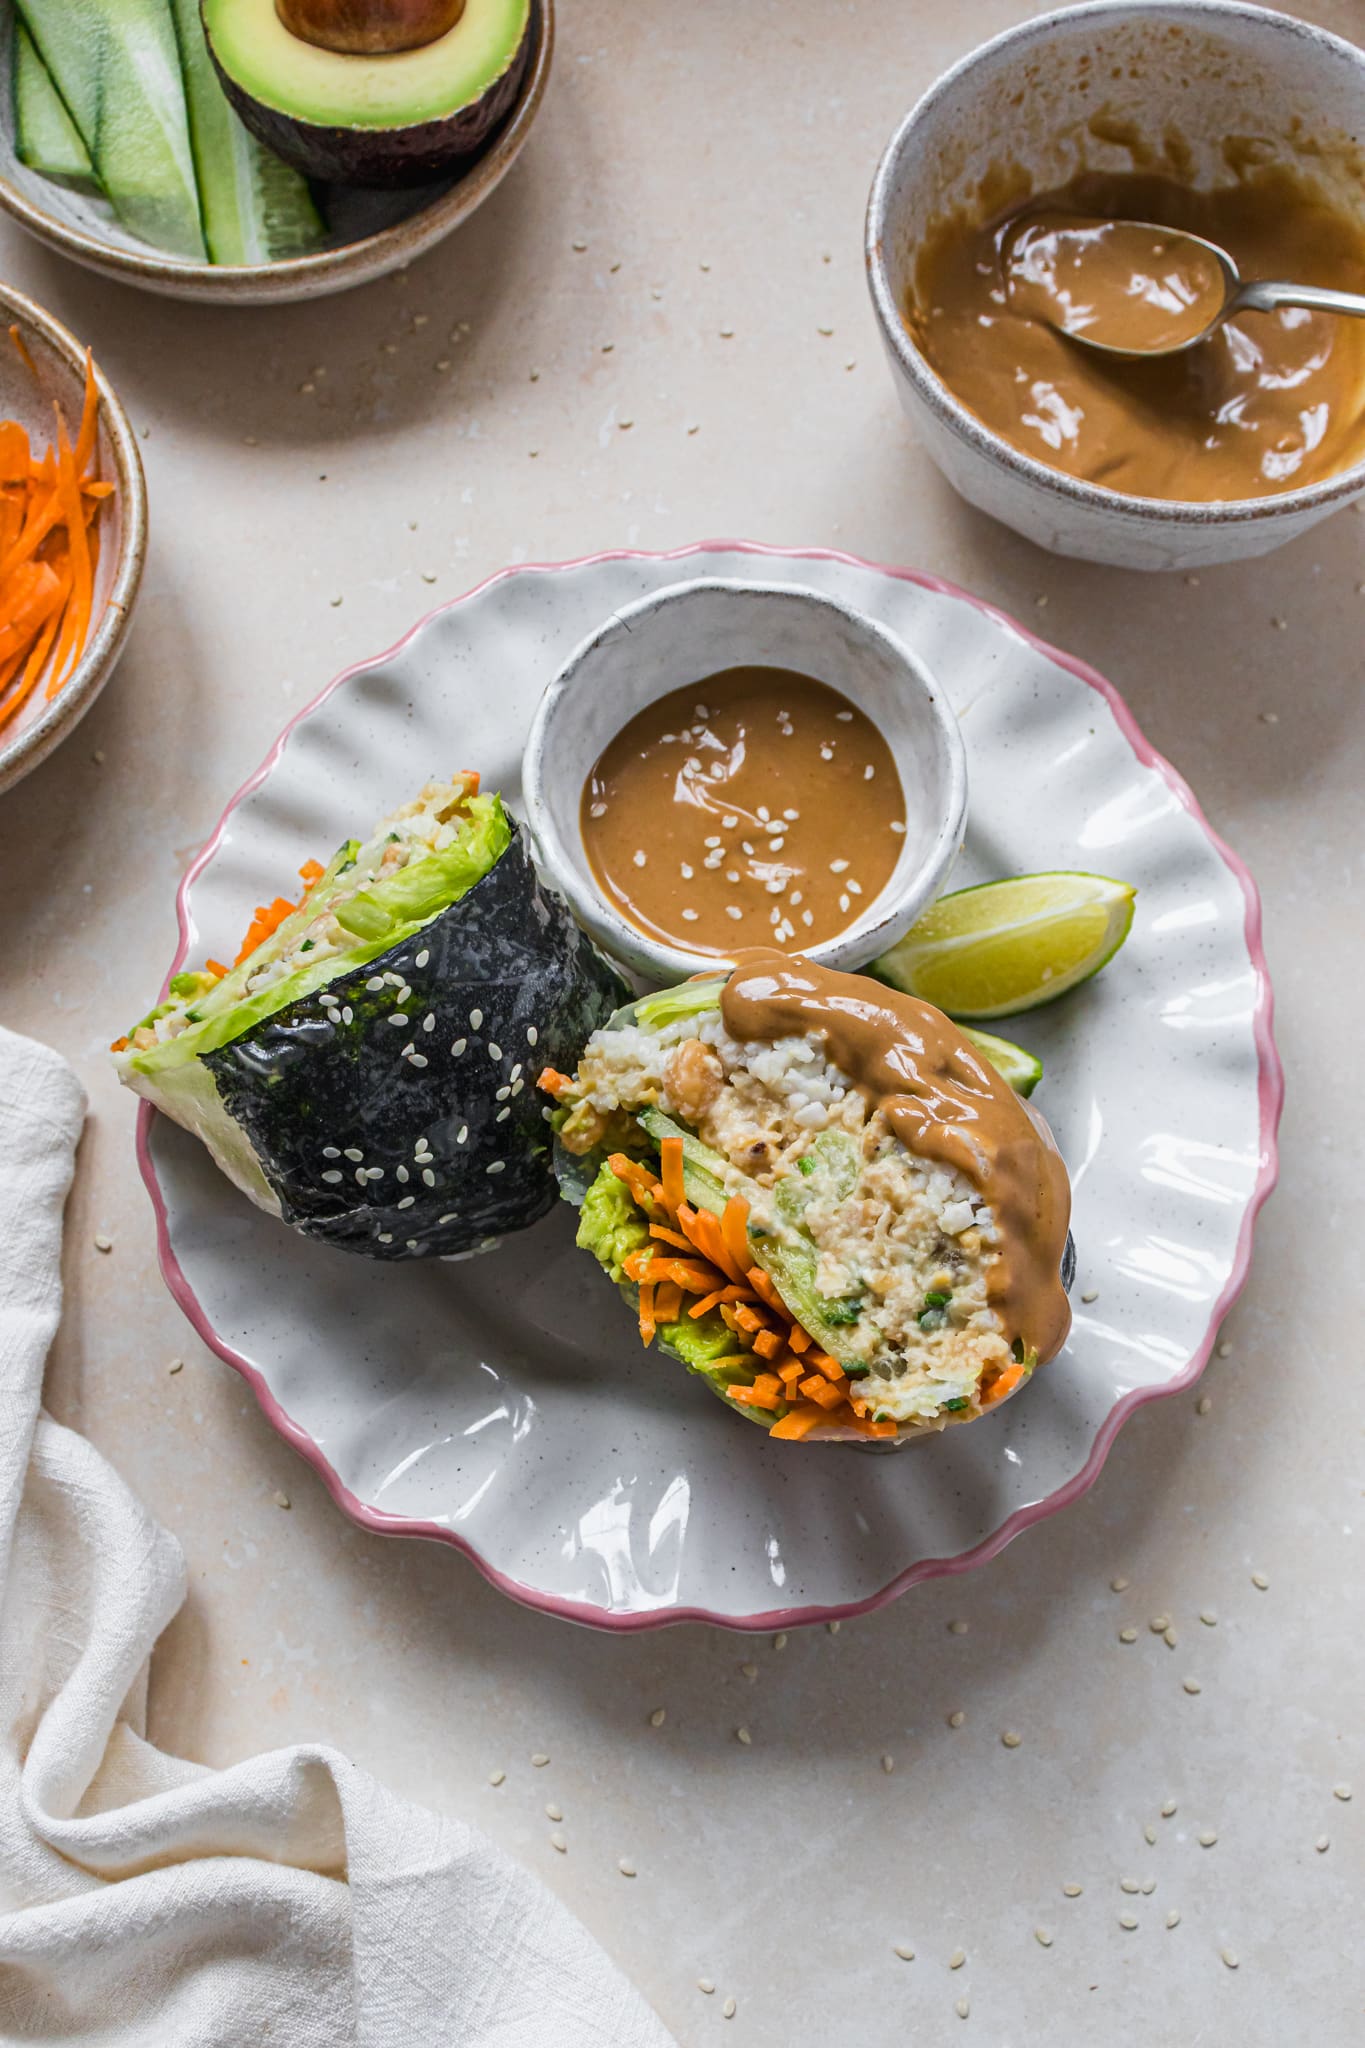

These Chickpea Tuna Sushi Rolls with tahini dipping sauce are a fun spin on a classic smashed tuna filling, with rice paper, nori and lots of delicious fillings. These are a great quick and simple lunch that’s naturally plant-based and gluten-free, too.
Since making these nori rolls the other week, I have made them a couple of times a week for lunch. They are so quick and easy, and once you know how best to roll them, they are pretty fail-proof. Pls, you can fill them with whatever you fancy (I have another recipe coming soon with tofu) and this tuna-style filling made with chickpeas is a current favourite. It is salt, briny and delicious, and you just need to smash all of the ingredients together. For the rest of the recipe, you only need to slice and chop and then dip the rice paper into hot water. You can use pre-cooked pouches of rice to make this even easier, too.

Why will I love these?
These rolls are so good:
- Fresh, vibrant and wholesome
- Packed with veggies
- Filled with a chickpea-based tuna-style filling
- Creamy and crunchy
- Easy to make in a few steps
- Naturally high in protein and fibre
- With a range of veggies
- The chickpeas are great for both fibre and protein
- Use your favourite veggies in here
- With sticky sushi rice
- A great filling yet light lunch (or dinner)
- Everyone will love these
- Gluten-free and nut-free
- With a delicious tahini dipping sauce
- Contains no mayo
- Great for gut health
- Full of plant diversity
If you already love the sound of these rolls, then skip ahead to the recipe card below. Or, first let’s discuss the recipe in more detail.


What ingredients do I need?
You can see the ingredients with weights in the recipe card below and see my favourite and recommended products in the “shop the recipe” section.
For the chickpea tuna:
- Chickpeas: I use the Bold Bean Co queen chickpeas as they are plump and juicy and therefore smash much easier.
- Dairy free yoghurt: make sure it’s unsweetened and thick like Greek-style.
- Fresh chive: or fresh mint or coriander as below.
- Spring onion: or use chopped celery for crunch. You can also use chopped red onion (about ¼ – ½ red onion).
- Gherkins: this is a brine-y flavour.
- Dijon mustard: for a rich flavour.
- Lemon juice: for the tang.
- Nutritional yeast: this adds a lovely flavour but if you don’t have any, you can leave it out.
- Salt and pepper: to season.


As for the dipping sauce:
- Tahini: the runnier and smoother, the better.
- Sriracha: for heat and flavour.
- Rice vinegar: for tang.
- Maple syrup: to add a little sweetness.
- Fresh ginger: for a lovely flavour.
- Dairy free yoghurt: as above.
And for the rolls:
- Sticky rice: cook sushi rice or buy the pre-cooked pouches and warm back up.
- Rice papers: I use the smaller ones, but you can make them with regular-sized sheets to make these bigger.
- Nori sheets: these add a great flavour, and I use the packs of small nori sheets so they stay fresher for longer.
- Lettuce: this helps hold it all together and acts as a “boat” for all of the fillings.
- Carrot: sliced thinly or in ribbons.
- Cucumber: slice this thinly to add freshness.
- Avocado: to add creaminess inside.
- Fresh mint: or you can use coriander.


Are these gluten-free and nut-free?
These are naturally gluten-free and nut-free (check your yoghurt).
How do I make these?
These are ready in a few steps:
- Add the chickpeas to a bowl: and smash with a fork.
- Stir in the other ingredients: to make the filling.
- Slice and chop the other filling ingredients: and cook the rice if needed.
- Whisk together the dressing ingredients: until smooth.
- Have a large chopping board to hand: one that is clean.
- Dip each rice paper into hot water: so that it softens slightly, not completely.
- Arrange 4 rice papers on the board: so they overlap in a square.
- Pile up the fillings: leaving a gap at the edges.
- Roll up the rice paper over the fillings and fold in the edges: as you would a burrito.
- Make the other rolls: and then slice with a large sharp knife.
How long will they last?
These are best eaten straight away or on the same day.

What other recipes can I try?
For more lunch ideas:
- Tomato Broccoli and Beans Pesto Pasta Salad
- Miso Tofu Smashed Cucumber Tahini Noodles
- Tofu Cream Cheese Tomato Toasts
- Spring Couscous Salad with Basil Pesto
- Vegan BLT Sandwich

Chickpea Tuna Sushi Rolls (Vegan)
These Chickpea Tuna Sushi Rolls with tahini dipping sauce are a fun spin on a classic smashed tuna filling, with rice paper, nori and lots of delicious fillings. These are a great quick and simple lunch that’s naturally plant-based and gluten-free, too.
Ingredients
For the Chickpea Tuna:
- 1 tin chickpeas, drained (240g drained weight)
- 2 large tbsp dairy-free yoghurt
- 1 tbsp freshly chopped chive
- 2 spring onions or 1 small stick celery, chopped
- 30g gherkins, chopped small
- 1 tsp Dijon mustard
- 1 tbsp lemon juice
- 1 tbsp nutritional yeast, optional
- Salt and pepper
For the Tahini Sauce:
- 3 tbsp runny smooth tahini
- 1 tbsp tamari soy sauce
- ½ - 1 tbsp sriracha
- 1 tsp rice vinegar or lime juice
- 1 tsp maple syrup
- 1 small piece fresh ginger, peeled and grated
- 1 tbsp dairy-free yoghurt
- Water, as needed
For the Rolls:
- 1 x 250g pouch sticky rice or 100g uncooked sushi rice*
- 1 tsp rice vinegar
- 8-12 rice papers
- 6-9 small nori sheets (or 1-2 large sheets)
- 1 few large lettuce leaves
- 1 large carrot
- ½ cucumber
- 1 avocado
- Fresh mint or coriander, if desired
Instructions
- If needed, start by cooking the rice. Or, warm up the pouch and once you have cooked, hot rice, stir in the rice vinegar and leave to one side to cool down.
- For the chickpea tuna, add the drained chickpeas to a bowl and smash with a fork until chunky. Add in the other ingredients and stir to combine. Season to taste with salt and pepper.
- For the sauce, add all of the ingredients to a small bowl (without the water) and whisk until smooth. Gradually add in 1-2 tbsp water to reach a smooth, pourable consistency.
- Prepare the vegetables. You want all of the fillings to be roughly the same length. Peel and then ribbon the carrot (or slice very finely). Chop the cucumber into pieces and then thinly slice into long strips. Slice the avocado and have a few lettuce leaves ready.
- Add some boiling water to a shallow bowl.
- Working efficiently, dip one rice paper into the warm water for a few seconds so that it is becoming see-through but still holds its shape (you don’t want it to be totally pliable) and place on a wooden chopping board. Repeat with a second rice paper and place it next to the first one, overlapping slightly. Place the third one below the first and the fourth one next to that, so you have a square-shape and they all overlap.
- Place a few nori sheets in the middle, leaving a few cm at the side edges. On top of this, place the lettuce leaves to act as a holder for the filling. Add in some rice, carrot, cucumber, chickpea tuna, courgette and herbs, if you like.
- Now use your fingers to lift the sheets closest to you up and over the filling, while folding the sides inwards and over the filling (like a burrito). Roll forwards to seal the rolls.
- Place to one side and repeat to make 1-2 more rolls.
- Slice in half with a sharp knife and enjoy with the sauce. Best eaten straight away or later that day (keep in the fridge in a sealed container).
Notes
*if cooking sushi rice, cook with double the volume of water and cook over a low simmer with a lid on for 20 minutes.
Shop the recipe

Stay in touch
I look forward to hearing what you think of these Chickpea Tuna Sushi Rolls so please let me know in the comments below and leave a star review. If you do make this, I’d love to see so please tag me, I’m @nourishing.amy on Instagram and use the hashtag #nourishingamy. I’m also on Twitter, Facebook and Pinterest – please say hello!
With sushi love x
 Skip to Recipe
Looks amazing! Do you have a recommendation for something other than yogurt? I hate yogurt, even non dairy lol Thanks!!
Hi there, you can use (vegan) mayo instead or cream cheese too for the chickpea smash filling and for the dressing, just use some (dairy-free) milk instead! Enjoy.