
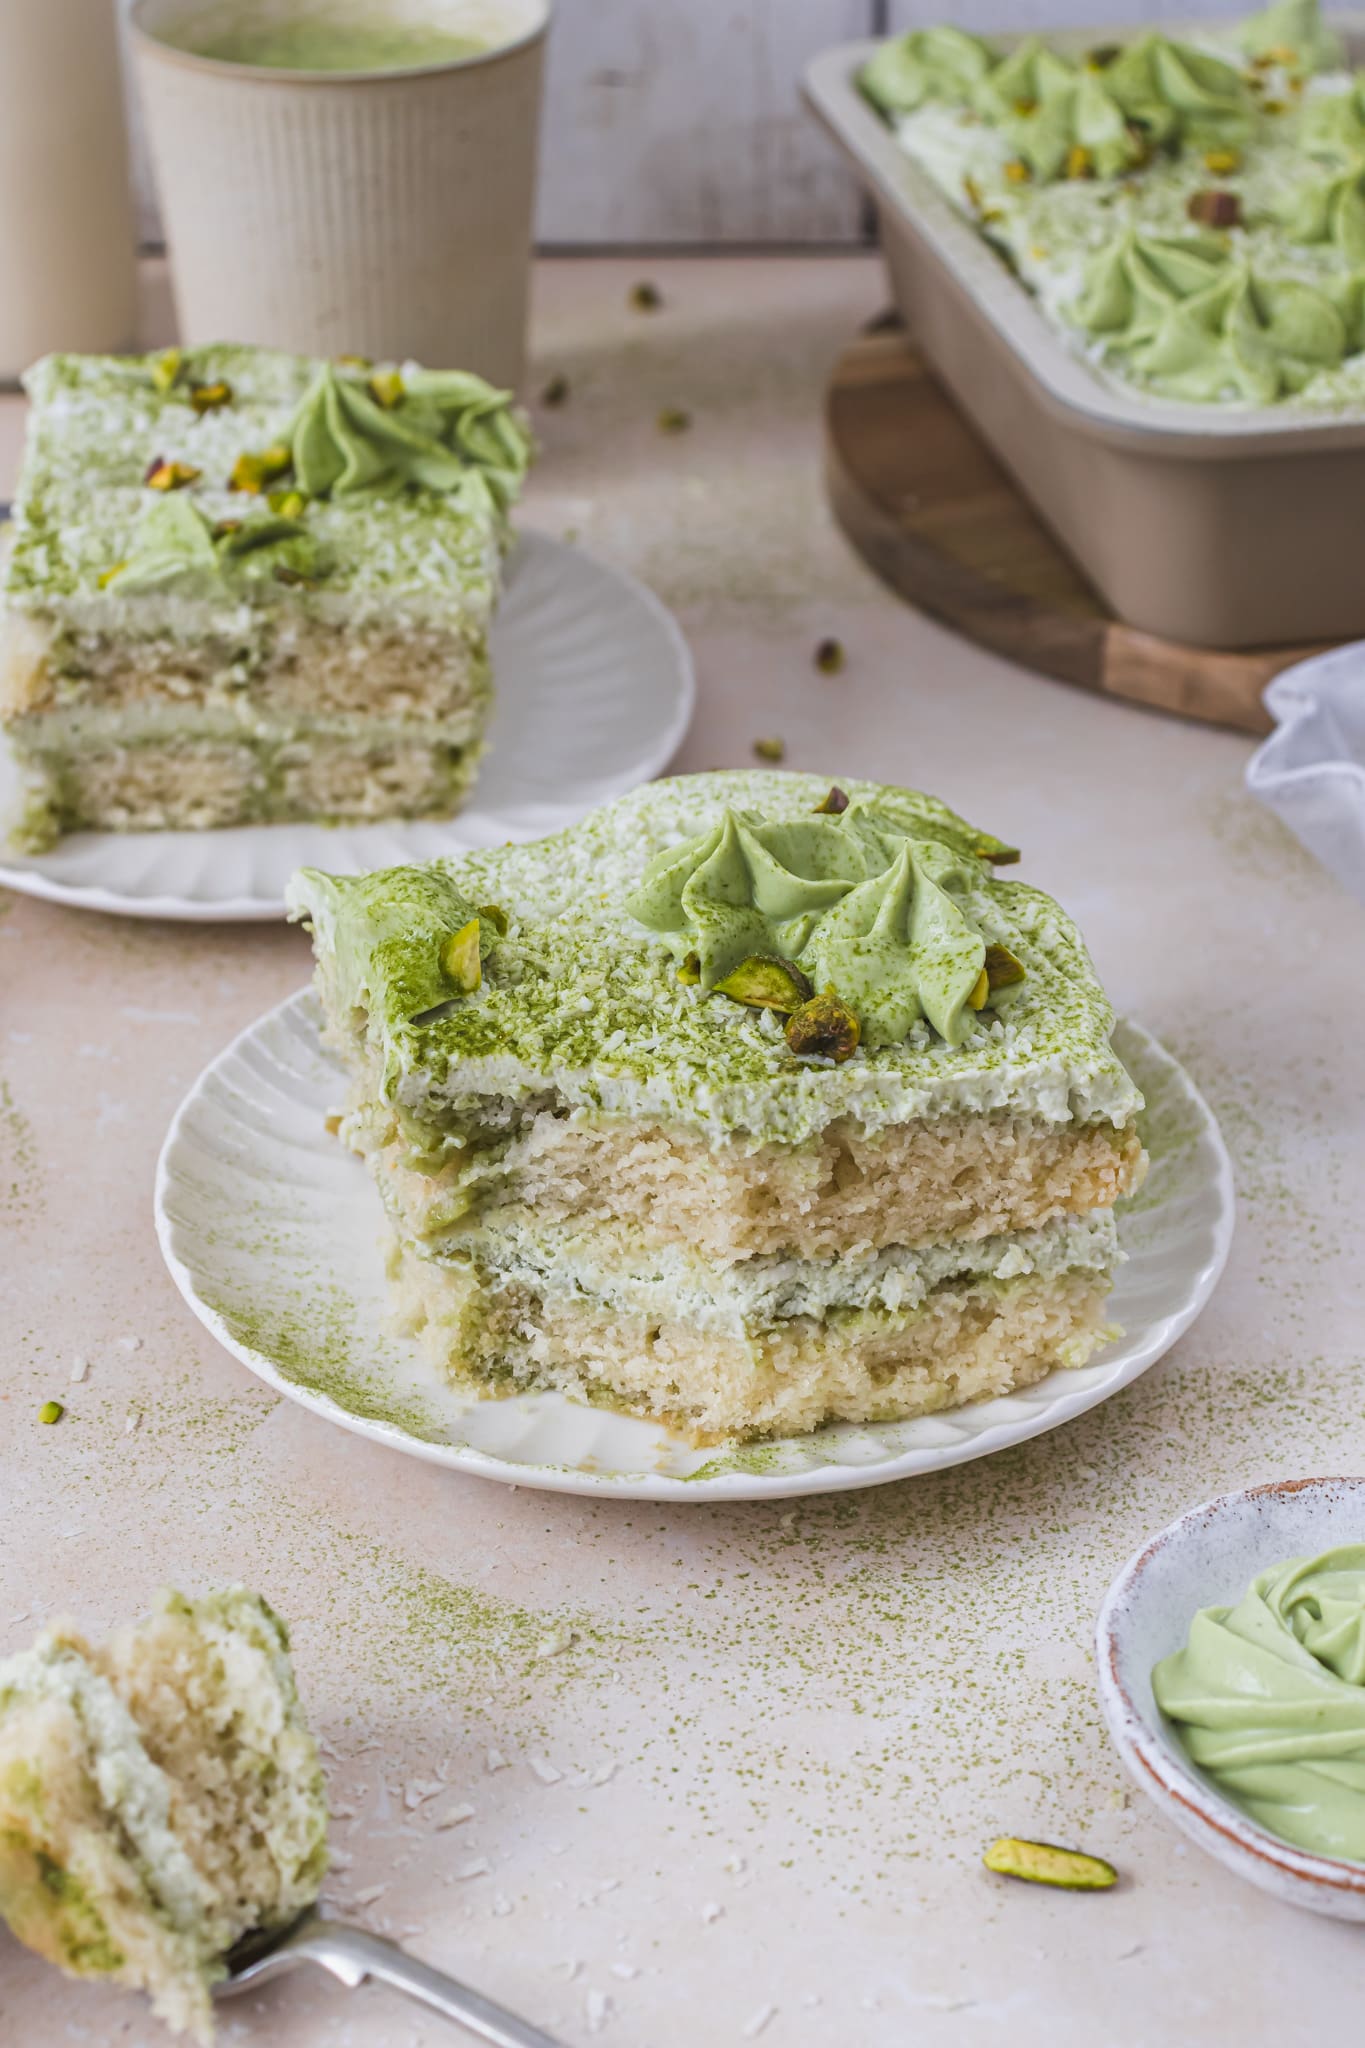

A delicious, layered Matcha Coconut Tiramisu dessert made with dairy-free and egg-free vanilla sponge cake, a matcha coconut milk soak and matcha infused whipped cream. This is a real showstopper dessert.
I love anything matcha-orientated, and a matcha inspired tiramisu dessert has been on my mind for a while now. There is matcha in each of the layers: the coconut milk matcha soak, the matcha infused coconut whipped cream and then a dusting of matcha on top, too. Even if you don’t love drinking matcha, I’d wager that you will enjoy a slice of this cake, as the vanilla sweetness and coconut cream cut through any strong matcha flavour. It lends a lovely green colour and vibrant flavour overall.

Why will I love this dessert?
This dessert is so good:
- Vibrant, flavoursome and so creamy
- Layered with cake, matcha and coconut whipped cream
- A great crowd-pleaser
- Ideal for dinner party desserts
- Even matcha haters will enjoy this dessert
- Can be made ahead of time and left in the fridge
- Use your favourite matcha powder
- I am using Biomel’s matcha gut powder
- With homemade cake sponge fingers
- Vegan lady fingers are very hard to find
- Easier than you think to make!
- Egg-free, dairy-free and vegan
- Nut-free
- A great source of fibre and probiotics!
- Using Biomel products
- A fun spin on the classic Italian dessert
- Light, fluffy and tender
- Everyone will love this
- A real showstopper
If you already love the sound of this dessert, then skip ahead to the recipe card below. Or, first let’s discuss the recipe in more detail.


What ingredients do I need?
You can see the ingredients with weights in the recipe card below and find my favourite and recommended products in the “shop the recipe” section.
For the cake:
You can skip this step if you are using ready-made lady fingers, like the traditional dessert.
- Sugars: this cake uses both caster and light brown sugar for a lovely light cake that also has a richer flavour.
- Plant-based milk: use your preferred dairy-free milk like oat, soya, coconut or almond.
- Thick coconut yoghurt: I use coconut yoghurt which is thick and creamy (Greek-style texture).
- Olive oil: use a light olive oil.
- Vanilla extract: for flavour.
- Plain flour: to keep the cake light and fluffy.
- Baking powder: for the rise.
- Salt: for flavour.


And for the layers:
- Matcha powder: this is Biomels’ new Matcha Complete Gut Powder which is made with ceremonial grade matcha and has billions of live cultures for the gut.
- Coconut milk: I use Biomel’s coconut gut shot which is packed with billions of live cultures and is also high in fibre.
- Coconut whipping cream: this is from Natures Charm and is so easy to use. Just whip up the whole tin until fluffy.
- Desiccated coconut: for more texture in the layers.
- Pistachios: for some added crunch on top.
Is this gluten-free and nut-free?
This cake is nut-free (check your yoghurt and milk) and while I have not tried this with gluten-free flour, you could try to bake this cake with GF flour (with xanthan gum) or I recommend using GF sponge fingers.


How do I make this?
This is ready in a few steps:
- Whisk together the cake ingredients: and pour into a tin.
- Bake for 25 minutes: until golden and risen. Allow to cool fully.
- Slice the cake into fingers: so you have 24 equal sized pieces.
- Whisk the matcha and coconut milk: to make the soak.
- Whip up the coconut cream and matcha: for the layers.
- Dip each sponge finger in the matcha milk: and arrange in a single layer in a dish.
- Top with some whipped cream: and desiccated coconut.
- Repeat with more matcha soaked cake, cream and coconut: and wrap tightly.
- Chill overnight in the fridge: this allows the layers to firm up and the matcha to soak through.
- Top with some more whipped cream, pistachios and matcha: and serve.
How long will it last?
This will keep for 2-3 days in the fridge, in a sealed container or covered tightly.

What other recipes can I try?
For more dessert ideas:
- Chocolate Orange Tofu Cheesecakes
- Mini Tiramisu Sponge Cakes
- Chocolate Coffee Truffle Tart
- Spiced Sticky Toffee Puddings
- Blackberry and Vanilla Cake

Matcha Coconut Tiramisu (Vegan)
A delicious, layered Matcha Coconut Tiramisu dessert made with dairy-free and egg-free vanilla sponge cake, a matcha coconut milk soak and matcha infused whipped cream. This is a real showstopper dessert.
Ingredients
For the Sponge Cake:
- 75g caster sugar
- 75g light brown sugar
- 120g thick coconut yoghurt
- 80ml plant-based milk
- 80ml light olive oil
- 1 tsp vanilla extract
- 210g plain flour
- 2 ¼ tsp baking powder
- A pinch of salt
For the Matcha Soak:
- 300ml coconut milk*
- 2 heaped tsp matcha powder**
For the Whipped Cream:
- 600ml coconut whipping cream
- 1-2 heaped tsp matcha powder**
- 4 tbsp desiccated coconut
- 2 tbsp crushed pistachios
Instructions
- Preheat the oven to 160Fan/180ºC and line an 8-inch/20-cm square tin with parchment paper.
- Into a mixing bowl, add both sugars, yoghurt, milk, olive oil and vanilla. Whisk until smooth.
- Sift in the flour and baking powder and add the salt. Whisk to a smooth, thick batter. Pour into the cake tin and smooth over the top.
- Bake in the oven for 25 minutes, until well-risen, golden brown and springy to touch. Allow to cool for 10 minutes then lift out to cool fully on a wire rack.
- Slice the cake into quarters and then each quarter into 3 “fingers” or strips. Now cut each finger in half depth-wise so that you have 24 sponge fingers.
- For the matcha soak, pour the coconut milk and into a large jug and add the matcha powder. Whisk until combined. Pour into a shallow dish.
- Whip up the coconut cream with 1 tsp of the matcha powder until light and fluffy.
- Using the same cake tin (or similar size), dip each sponge finger into the matcha soak to allow the mix to sink into the cake and then arrange into the dish. You will be able to fit 12 (half of the sponge fingers) onto the bottom layer. Spread over almost half of the matcha whipped cream and sprinkle over half the desiccated coconut.
- Repeat with more matcha soaked cake fingers, and then more whipped cream (leave about 1/6 of the mix for the next day – stored in the fridge) and desiccated coconut.
- Wrap up tightly and allow to chill in the fridge overnight to firm up.
- When ready to serve, mix more matcha powder with the remaining whipped coconut cream and then pipe onto the top into patterns.
- Sprinkle over the crushed pistachios and dust with more matcha, if you like.
- Serve straight away and keep leftovers in the fridge for 2-3 days, covered tightly or in a sealed container.
Notes
*I am using Biomel’s Natural Coconut Gut Shot.
**Biomel’s Matcha Complete Gut Powder.
Shop the recipe

Stay in touch
I look forward to hearing what you think of this Matcha Coconut Tiramisu so please let me know in the comments below and leave a star review above. If you do make these, I’d love to see so please tag me, I’m @nourishing.amy on Instagram and use the hashtag #nourishingamy. I’m also on Twitter, Facebook and Pinterest – please say hello!
With matcha love
p.s. this recipe was first made with Biomel who I love and this blog post is not sponsored.
 Skip to Recipe